
At the Wizarding World of Harry Potter, Universal Studios Hollywood
Making a Hogwarts robe was always something I had wanted to do. What better time than when they are finally opening The Wizarding World of Harry Potter in Hollywood!
So one time, I was at my friend Jessica’s house with a few people, and they were all taking the sorting hat quiz. One by one they got the result they had expected, and then it was my turn. As I continued taking the test, each question filled me with more worry–“oh no… I’m going to be a Hufflepuff.” It came to the end of the test, and there it was. I was a Hufflepuff.
I didn’t know what to think. We laughed for a bit, but after a few days, I really began to think about it. Not gonna lie, I did some soul searching. That’s when I found a few videos to help me figure this out, including a few silly ones like “Sorted this Way” by Not Literally and some more helpful ones like JK Rowling on why Hufflepuff is her favorite house. (Hint-Hufflepuffs stay to defend–ahem something– at the end of the 7th book for a different reason than the Griffindors. For them, it wasn’t at all based on showing off or being fool-hearty. They did it knowing the risks.) As the song says, now “I’m Hufflepuff and I’m proud!”
So naturally, I wanted a Hufflepuff robe, so Angela and I went looking for fabrics and tutorials. Thankfully, I didn’t make the robe before I was sorted into Hufflepuff! I guess I always thought I was a Griffindor because I didn’t know much about Hufflepuff and didn’t identify with the other two. As we saw some pretty awesome fabrics, we talked about how Luna probably made her own Hogwarts robes with fun patterned fabric instead of just plain blue, and how fun it would be to have fabric with cool designs on them. Now you can make your own robe however you want!
Anyway, you’re here to learn how to make your very own Hogwarts robe! I started with this Tutorial from Livejournal user Propaganda-13 and continued making alterations until we ended up with this tutorial. Let’s get started!
GETTING THE MATERIALS
Materials:
- Simplicity 5840 which I bought off Amazon, but you may be able to find in stores also. You’ll be making the B pattern which is the blue silk robe.
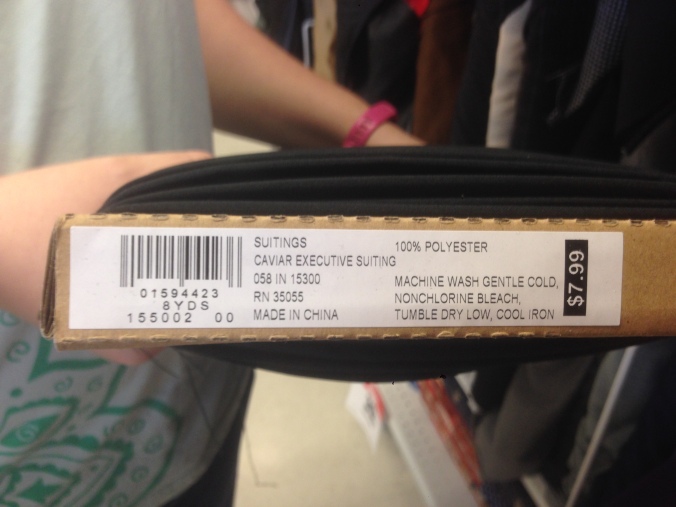
- About 7 7/8 yards of black fabric like Garbadine, Twills, Broadcloth etc. I used polyester “Suitings – Caviar Executive Suiting” #01594423 with a cut of 7 7/8 yards of fabric. Make sure the fabric is at least 45″ wide, but if you want it to be more billowy like mine, I suggest using 52” wide fabric. Then the back can be all in one piece (or mostly one piece) without a seam down the middle. If you’re doing a 45″ wide fabric you may need to buy more.
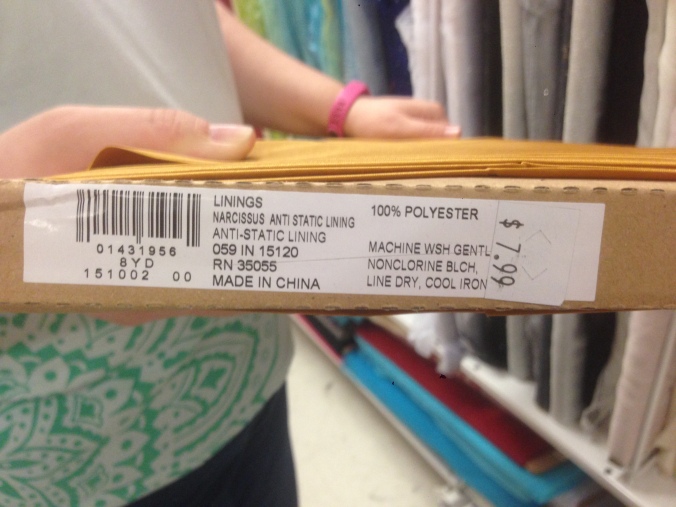
- About 3 or 4 yards of colored fabric for the colored part of the inner lining. I used “Linings – Narcussus Anti Static Lining Polyester in Gold # 01431956 with a cut of 3 or 4 yards of fabric. You will need enough for the front lining (Your heightish) plus the sleeves AND the hood- probably 4 yards, but you can probably do 3 and if you need another yard go buy it. You can use any fabric most likely, some other recommended fabrics include Raw Silk, Taffeta, or a Crepe Satin.
- Black Thread
- A newspaper or two to alter the patterns. Even better than this might be some large butcher paper, but whatever you have.
Optional Materials:
- Tassel for the point of the hood. This makes the hood lay nicely and adds a nice touch
- A patch to represent your house. I bought one and didn’t put it on, it would have ruined the way the robe lays nicely open on both sides
- A frog clasp OR two black buttons and four inches of black hat elastic or black ribbon. I bought a frog clasp for this but didn’t end up putting it on – I loved how the robe looked open!
- About six 1/2″ metal washers to weigh down the bottom of the robe if your fabric is light. I didn’t end up doing this either, but it makes sense. My robe had so much fabric, it didn’t need the extra weight.
Once you gather your materials, throw the fabrics into the washer and dryer. I made the mistake of using liquid fabric softener with my gold fabric and it left spots all over. They will come out, but still. The black fabric was fine with the softener and everything though. You may be tempted to skip pre-washing your fabric, but don’t. You don’t want your robe shrinking and puckering after you cut and sew it perfectly! Take the extra few hours and do this step, and you can cut out and create your patterns as they’re drying anyway.
ALTERING THE PATTERN
This way of altering the pattern will still keep the original pattern in tact, in case you make a mistake or ever want to go back to the original pattern. That’s why you need the newspaper. Also grab some tape to piece the paper together if needed. Begin by cutting out just the tissue paper pattern pieces 1, 2, 4, 5, and 6. Feel free to extend the length of pattern piece 1, just make sure the bottom holds that same curve.
Originally, you will have 5 pattern pieces:
- 1: Front & Back
- 2: Yoke
- 4: Hood
- 5: Neck Binding
- 6: Sleeve
Once we have created the altered patterns, you will have 7:
- 1&2b: Back
- 1&2f: Front outside
- 1&2f-c: Colored inner lining (or use the 1&2f folded in half)
- 1&2f-b: Black inner lining (or use the other folded part of 1&2f)
- 4: Hood
- 5: Neck Binding
- 6a: Sleeve Altered
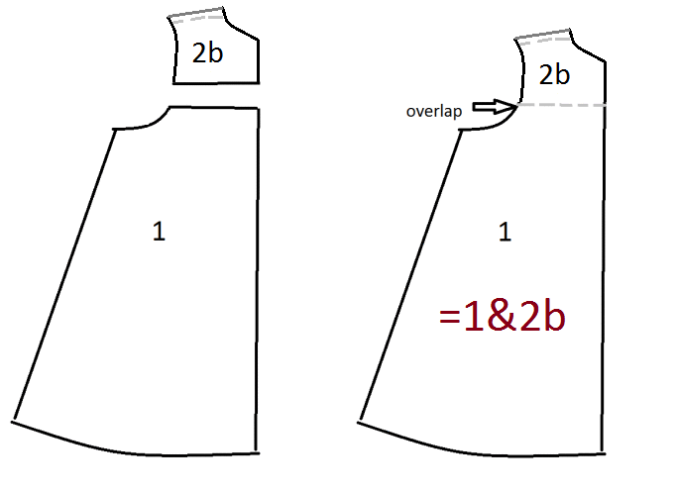
Starting with piece 2, the yoke neck piece, trace it on a piece of newspaper or butcher paper and cut that out. Write “front” and “back” on the pattern corresponding to the sides of the yoke. Fold this new piece 2 pattern in half. That fold is where the shoulder seam will be. Cut along that line. Retrace the patterns adding a seam allowance along each side of that new cut, or just tape on a piece of paper to make the seam allowance. Now label your new patterns 2f (for 2 front) at 2b (for 2 back).

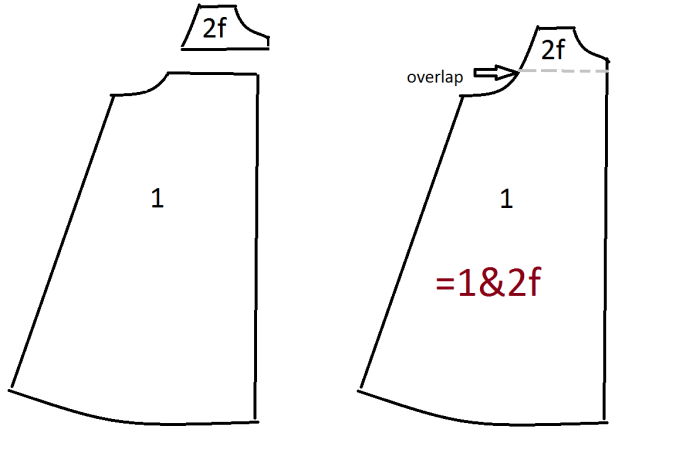
Now let’s alter piece # 1, the main robe piece. You are going to have one full black left side front and one full black right side front. These make the outside front of your robe, you don’t need any color for it. We are calling these pieces 1&2f. It is the main piece 1 plus the FRONT of the yoke (2f for 2front). I pinned these two pattern pieces together (don’t tape, you’ll need piece 1 again to make the back) and overlapped them 5/8″ to take away the seam allowance that you no longer need since you aren’t sewing those pieces together.
Now for the colored and black lining. You can either trace and cut out new pieces or fold piece 1&2f and cut it out accordingly. Either way, make sure you add on an additional 5/8″ seam allowance along the new edge of the patterns so that when you sew the lining, it’s not smaller than the outside. Once 1&2f-b (piece 1 pinned to piece 2 front – black liner) and 1&2f-c (piece 1 pinned to piece 2 front – colored liner) are sewn together, they will be the same size as one black outside 1&2f piece. Here is what you will essentially do for the inner liner pieces:
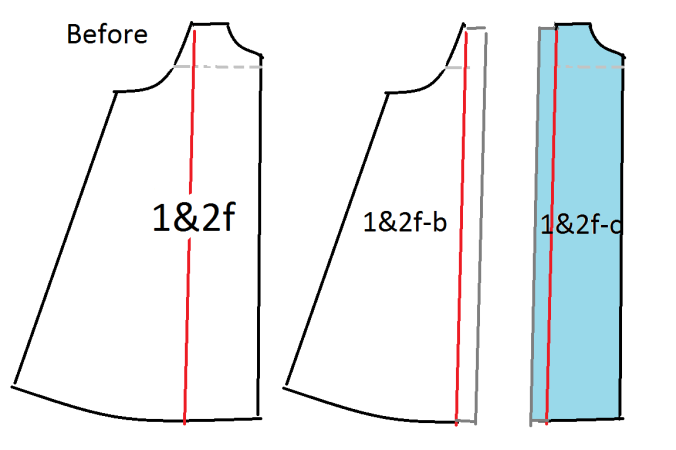
On the left, you see the normal all-black front outside pattern. The other two to the right of that will be your new patterns. The middle pattern is with black fabric, and the right pattern is with your colored fabric.
Let’s alter the sleeve pattern now. We’re going to make the opening of the sleeve wider and have it curve down, making it longer at the bottom. Begin by tracing pattern 6 onto your paper. Now draw on your alterations to the LEFT side ONLY. You will fold the new pattern perfectly in half to get this to be perfectly symmetrical and trace that new line to the right side as well. You want all your seams to line up perfectly. Cut the pattern out. This is your new pattern piece 6a (6 altered).
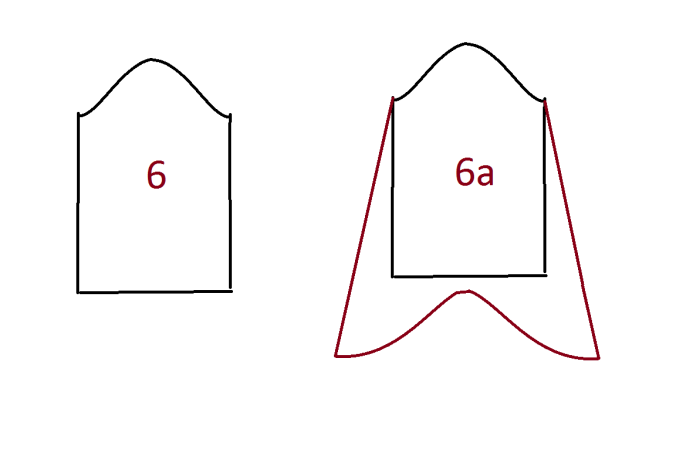
Before on the left, after on the right.
CUTTING THE FABRIC
At this point, your fabric should be washed and dried. Not quite? It’s ok, you’ll want to read through the pattern directions until you understand how it will all piece together anyhow. Read all, then cut. BUT WAIT!! Not only do we need to do a similar alteration for the back of the robe as we did for the front, but we ALSO need to cut the piece out in a very different way. Please follow the instructions when cutting them out.
We are calling this back robe piece “1&2b.” It is the main piece 1 plus the BACK of the yoke (2b for 2back). I pinned these two pattern pieces together (don’t tape) and overlapped them 5/8″ to take away the seam allowance that you no longer need since you aren’t sewing those pieces together.
When it comes to cutting the back of the robe, you have two options.
- Cut two pieces from pattern 1&2b and have a seam down the middle of the back.
- Cut one piece specially on the fold of your fabric and don’t have the seam.
If you are using the 52” fabric, you can cut the back piece (1&2b) on the fold and not have a seam down the middle back. Because I wanted my cloak to have lots of fabric like Professor Snape’s super billowy cloak, I added even more width to the bottom of this pattern piece. Make sure you add more width ONLY to the bottom. You don’t want your robe to look like it belonged to a linebacker before you got it!! The way I did this was I placed the pattern on the folded over fabric so that I could cut through 2 layers at once and lined the fold up with where the middle back seam would normally be.
Remember to include the BACK piece from the halved yoke. When the pattern was in place, I inserted one pin at the top of the pattern on at the fold to hold the top corner of the pattern in place. Now you can rotate the pattern while that corner stays in place. Rotate the pattern so that the bottom of the pattern moves AWAY from the fold.
You will be cutting along all the edges of the pattern but NOT the edge on the fold. That will stay perfectly intact. You can rotate it as far as you want to add more fabric to the back of the robe. Just remember to cut the bottom in that curve. I actually rotated the pattern BEYOND the edges and added a triangle of fabric on each side at the bottom to complete the pattern, I just wanted THAT much fabric at the back of my cloak. This part is totally up to you!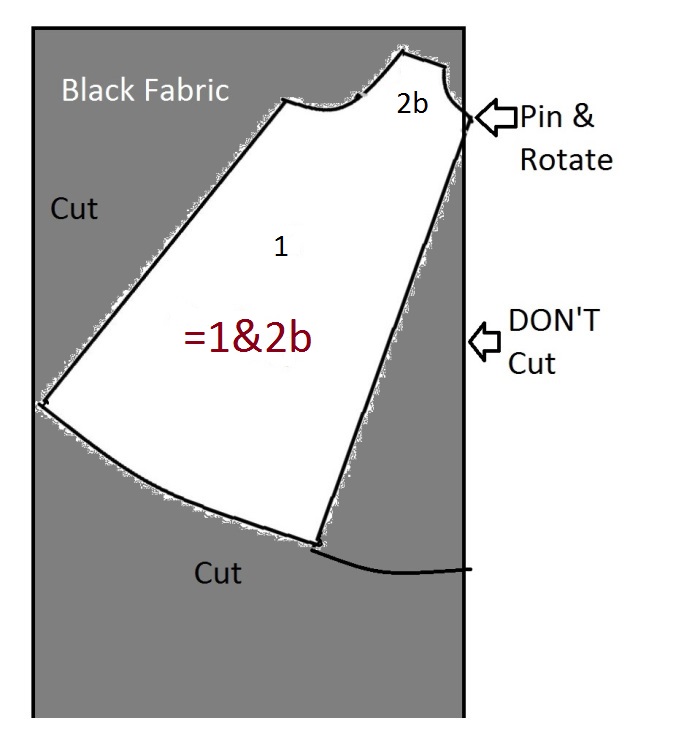
Outside Black Fabric:
Cut two of 1&2f (front outsides, left and right)
Cut one of 1&2b on the fold (back of robe, one large piece-SEE DIAGRAM)
Cut two of 6a (outside of sleeves)
Cut one of 4 on the fold (the hood – it should open like a butterfly when you’ve cut it out)
Lining, Black:
Cut two of 1&2f-b (remember the seam allowance where the black and colored liners meet)
Lining, Colored Insert:
Cut two of 6a (lining in sleeves)
Cut two of 1&2f-c (remember the seam allowance where the black and colored liners meet)
Cut one of 4 on the fold (the hood – it opens like a butterfly)
SEWING THE ROBE
SEWING THE MAIN STRUCTURE:
- First, sew one colored inner liner to one black inner liner.
- Use the seam allowance you added to the piece when you cut it so that once it is sewed, it is the same size as the solid black front outside piece.
- Now you have one full inner liner.
- If you have two separate back pieces, one left and one right, sew them together now so you have one back piece. If you have the extra triangles to extend the bottom width like I did, sew those on now.
- Another step that might be easier now is to sew the wand pocket into one of the liners. You may need to wait, though, so that you will know exactly where it will lay.
At this point, you will be sewing the front outside, the front liner, and the back piece together at the shoulder seam. We want the seam to not show, so we’re going to sew it in a way so that the seam goes in between the front outside and front liner never to be seen again.
- Take the liner you just sewed and hold it up to your chest where it should lay. Figure out if it is the left or right side – you will want the seam to stick OUT away from your body so that the front piece will hide it. (This seems contradictory, but you do want the seam fabric to face forward so that the nice seam is against your body) This way, when you open the cloak, you won’t see an ugly seam sticking out.
- Still holding that piece, Pick up one of your solid black front pieces and lay it overtop of the liner how you will want them to be together.
- Pick up the large back piece and put it against your back how it should lay. *if you have any seams on this, make sure the seams are facing in, so you won’t see an ugly seam from the outside!
- Have someone pinch the three pieces together at your shoulder with their fingers.
- Carefully, flip the front outer black piece straight over the top so it falls on the back. Still holding those pieces together, line all three of those top edges up together.
- You should now have the colored liner in front with the nasty seam facing out so you can see it. In the middle is the back of the robe. At the back is the solid black front piece.
- Pin these together well and test that the seam will be hidden by flipping that front solid black piece back over to the front. You should have a nice flat clean seam on the top and underneath. If you did it right, GREAT! Flip it back and sew across that line. If you want to double check, feel free to do a basting stitch first (one that is easy to take out) and see if it comes out right!
- Use the seam allowance you created when you separated the yoke piece. If you forgot a seam allowance, just do a small seam and make sure it’s sewed well.
At this point, we will do the exact same thing for the other side. A few notes for the second side:
- It MATTERS how you sew the two liner pieces together. Take some time to line them up and piece them together, making sure that the seam will face outward on the OTHER side when you hold it against your body.
- Take your time again while you are holding the pieces up to your body and make sure the pieces are lined up correctly. Don’t cut corners, test the seam just like you did the first time.
Now your robe has some weight to it!! Congrats, it’s probably feeling pretty nice!! Place it on your shoulders, see how it feels so far!
THE SLEEVES:
- Follow the picture instructions in your pattern to sew the black sleeve to the robe. The whole side of the robe will be open, so just sew the curvy top part of the sleeve to the arm hole area, don’t close up the arm. (If you put it on at this point, the bottom of the sleeve will be open and under the armpit all the way down to the floor.)
- Remember again to sew it so that the seam will be on the inside, don’t let it stick up off the shoulder!
- Lay the colored sleeve lining overtop of the sleeve and sew all along the edge where your hand will be popping out. If you do this right, you should be able to tuck the colored insert underneath and it will create a clean seamless edge along the sleeve opening.
- Flip the whole robe inside-out and pin the edges together – matching up the armpit pieces and going out over the sleeve all the way through the colored lining of the sleeve, and from the armpit down, sewing MOST of the way down but NOT ALL the way down to the bottom of the robe.
- Leave about 4 inches at the bottom that it’s not sewed together. This will make it easier to hem later on.
- To reiterate—you will sew along your pins from the armpit along the black part of the sleeve, continuing through the colored liner of the sleeve to the end of the colored liner. This is a bit hard to figure out, but the next step will be flipping the inner liner in, so it’s important that both sections of the sleeve are sewed making the “tube” of the sleeve.
- You will also be sewing from the armpit down, sewing all three layers together (the front outside, the front inner liner, and the back of the robe) almost all the way to the floor.
- After you sew this, if you turn the robe right side out and flip the inner liner in, you will see it taking shape. None of the seams should be visible except the side seam if you open the robe. You’ll see some of those seams.
- With the robe inside out, slip the colored liner tube over your sleeve and match the top of the colored liner sleeve up to the seam where you sewed the black part of the sleeve to the robe. Sew them together along that same seam you sewed before.
- TEST that the sleeve and liner will lay nicely and not pucker before you sew this. Feel free to iron this first to make sure it will lay nicely!
- Repeat these steps on the other side!
OH MY GOSH now you have so much of your robe completed!!! I’m sure you have been putting it on along the way, but now it’s really getting there.
ALTERING THE WIDTH OF THE FRONT:
Put on the robe. Feel the shoulder seams that run from your neck to your shoulder, and place it where it should lay. At this point, I placed the intersection of the sleeve and the robe where I wanted it to lay on my shoulder as well, keeping in mind the length of the sleeves.
- With the robe in place where you want it to lay, close the front of the robe. The first time I did this, mine overlapped like a kimono or bath robe. I did NOT want that to be the case. I wanted the front to match up flush like they do in the movies.
- Measure how much fabric needs to be taken off of each side to get it how you want it.
- Starting with the side WITHOUT the wand pocket, flip one side inside-out and sew that seam. You have 2 choices:
- Cut off the extra fabric now-making SURE to leave a seam allowance so it’s not too thin once you sew it!
- OR Sew the seam however many inches in you measured, and cut off the extra fabric afterwards, leaving a bit of a seam allowance so it won’t come undone.
- Flip it right side out and put it on again, testing the fit.
- Before doing the other side, now would be a good time to sew on the wand pocket and any other pockets you may want into your robe liner! You still have plenty of openings to make this easy. I went with a weft-pocket similar to the Universal HP robes. Look up how to do this on Youtube. I went with this welt pocket tutorial.
- Repeat steps 3 and 4 on the other side.
Now you really have an almost fully done robe!
THE HOOD:
- Because you have a liner, you will basically be making two hoods and then piecing them together. Following your pattern’s instructions, sew the seam on the black hood piece. Now sew the seam on the hood on the colored hood piece. If you want a tassel on it like I had, now is the time to follow the instructions from the pattern to add it.
- Putting the two hoods together RIGHT sides together (with both seams facing outward), pin and sew the edge of the hood that outlines your face if you have the hood up. Sew along that edge.
- Flip the hood right-side-out and follow the instructions again to put this together.
- Create the pleats at the neck of the hood and baste stitch around it.
- Get ready to attach the hood to the garment.
ATTACHING THE HOOD:
- Put the robe on, lining up the shoulder seams like you did at first. Make sure the garment lays in the way you want it to lay in the front and on the shoulders.
- Lay the hood over your shoulders as if it were attached and down.
- Note where the pieces would best fit together and begin pinning the hood to the neck of the garment.
- Keep in mind that you can trim the neck to be wider if need be. Keep testing this out.
- Make sure the seams face inward toward your neck so that if you have the hood up, no seams will poke out. You will cover this inner seam later with colored liner fabric.
- Once it is all pinned in place and you like the way it lays both up and down, sew the hood to the garment. Sew slowly and carefully as this is a thick seam for your machine to get through. Careful you don’t break a needle.
NECK SEAM COVERING:
- Follow the instructions on covering this neck seam.
- I cut one colored strip a little longer than the neckline we need to cover (from piece 5). Feel free to cut piece 5 a little wider than they have it.
- Sew one edge flush to the top side of the neck seam you need to cover, with most of the fabric going up toward the hood.
- Sew a LITTLE closer to the garment than most of your stitches or just on it so that when you flip it down they will be covered.
- Fold that down over your ugly neck seam.
- Tuck your seam allowance under itself and hand-sew in place, or use the machine if you don’t mind a black seam going across. If you’re hand-sewing, use an invisible stitch pattern so you can’t see it.
- Tuck the ends of this “tube” in or under, and sew those in place also either by hand or by machine.
MEASURING and CUTTING THE HEM*: *you will need a friend for this, preferably someone who isn’t completely oblivious to measuring and how a robe should lay
This hem is a bit more complicated than most pieces. Just like most of the seams in this garment, you will want the outer and inner liner in the front to fold up inside towards each other so that on the inside the colored insert goes all the way to the floor and on the outside the black goes all the way to the floor. If you fold the hem up toward the inside, you will have a black hem along your colored lining at the bottom.
- Put the robe on. All parts except for the hem should be complete at this point. If anything is missing, add it now. The only exception is the frog clasp, that can be added later. Here are some things you MAY want to add:
- House or Hogwarts patch (I chose not to add this because I like to wear mine open, and I didn’t like how stiff it would make one side – it wouldn’t be able to nicely lay open.)
- Wand pocket if you haven’t already added it. This will be near impossible to do after hemming.
- Other pockets you want in the liner (I maybe should have done this, I was in a time crunch. It would be nice to have a place for my muggle phone!)
- Figure out what shoes you will wear with it and put them on.
- With the robe sitting just how you want it, have your friend put pins exactly where you want your robe to end. Be sure they put enough – too few and you may have spots that are too high or too low.
- Lay the robe out on the ground and figure out how much you need for seam allowances. (We went with 2 inches for the back part and 1 inch for the front.)
- The back seam will be a seam where you fold the fabric up twice. Measure your length and draw a line with chalk at the end of your seam allowance where you need to cut the fabric. (don’t worry this won’t show up later) This line should be curved, not straight across. Cut the fabric on this line.
- The front seams will be where you fold the layers INWARD. The front will fold back and in, the liner will fold forward and tuck in. Measure you necessary seam allowances (we did 1 inch I think) and draw your chalk line. Again, be sure the line is curved. Cut along this line making sure you are cutting the front outside and the front liner (both front layers).
SEWING THE HEM:
- To pin the front hems in place, fold the inner and outer layer in towards each other at the bottom. Pin. It will want to pucker, but do your best and pin it like crazy.
- To pin the back hem in place, fold the bottom up inwards once, then inwards again. This will be tricky since the piece is curved, it will want to pucker. Just do your best and pin it like crazy.
- Put the robe on once more and test the length.
- Fix any issues with length or consistency.
- Get ready to sew
- Now we will sew the hem, but please keep in mind WHERE the stitches should be in each section:
- For the hems in the front of the robe, you will want to sew close to the bottom so that the fabric won’t come slipping out at the bottom.
- Once you get to the back of the robe, sew the hem at the TOP of the folded fabric so that it won’t fold back down or come undone.
- At this point, also sew that few inch section you left undone when you were sewing up the sides of the robe – you left that undone so you could do the hem easier, but sew it up now.
FINISHING TOUCHES:
- Iron all seams you want to be crisp. This made a HUGE difference at the front of the robe where the two sides meet, and it also made a huge difference at the sleeve ends.
- Decide if you want to sew a closure on and do that if you do.
- Make sure all seams are stitched up well – check the armpits for holes, any major seams, etc.
- TAKE AWESOME PICTURES!!!
CONGRATS, YOU’RE DONE!!! ❤ Post some pics! Go to HP world and take some photos if you can, or take pictures of yourself “exploring the muggle world” in your full robes!! 😉
Hope this helped you make an AWESOME robe!!


RESOURCES

Love this pattern, was just wondering how you pieced together 1&2b. Either seems like you missed it in the instruction or I’ve missed it. Thanks
LikeLike
You are right! I’ll try and fix this soon!
UPDATE: Fixed!!
LikeLike
Pingback: The Robe Who Lived – RUBBISH SEWING
Sorry if I missed it, just skimming through… How much would it cost to make this?
LikeLike
Hmm that is a very good question. It totally depends on what fabric you use, but I probably spent around $70 or $80 if I can remember that right for mine. If you buy fabric at Jo-Ann’s, make sure you use a 50% off coupon on the big cut of fabric if the fabric isn’t on sale. If it is on sale, they usually have a 20% off total purchase coupon, or you can wait till it goes off sale again. Remember you can use both coupons. I still saved a bit off the price of the robes in the park since theirs are $110. And I got a better robe out of it 🙂 Best of luck!!
LikeLike
Oh, alright. Thanks a bunch!
LikeLiked by 1 person
Pingback: Harry Potter Hogwarts Robes: Best DIY Patterns & Tutorials
We are having a hard time with the hood.. please help … (this tutorial has been fantastic and it looks great so far!)
LikeLike
Sure, what was the question? When I get a chance, I can reword the instructions in a comment here, or let me know what specifically was confusing. Thanks!
UPDATE: Fixed! Reworded the hood instructions in the tutorial and in a comment below. Thanks!!
LikeLike
THE HOOD:
Becuase you have a liner, you will basically be making two hoods and then piecing them together. Following your pattern’s instructions, sew the seam on the black hood piece. Now sew the seam on the hood on the colored hood piece. If you want a tassel on it like I had, now is the time to follow my instructions to add it.
Putting the two hoods together RIGHT sides together (with both seams facing outward), pin and sew the edge of the hood that outlines your face if you have the hood up. Sew along that edge.
Flip the hood right-side-out and follow the instructions again to put this together.
Create the pleats at the neck of the hood and baste stitch around it.
Get ready to attach the hood to the garment.
I hope that made it more clear!!
LikeLike
My best friend and I followed your tutorial perfectly and are very happy with how they turned out! We got lots of comments at universal! Thank you for sharing this!!! IMG_2524
LikeLike
So happy to hear that!! If you can share pictures, feel free. Thanks for letting us know, glad they turned out great! ❤
LikeLike
I didn’t see black lining material in your instructions, but you mention it in the sewing. How much black lining did you buy and what material?
LikeLike
Barbara,
The black ‘lining’ is actually the same fabric as the main black fabric. I only call it lining because you use it in the inner part of the front of the robe on both sides. Hope that clears it up!
Rebecca
LikeLike
Pingback: DIY Hogwarts Robe in Under 2 Hours - Crafting a Green World
Pingback: Here’s an Easy Way to Make a Hogwarts Robe | hometips.co.za
I followed your tutorial and made a robe from each house. Last night four of us attended a Day of the Dead party as students from the four houses of Hogwarts. We got a lot of compliments on the robes! Thank you for sharing!!
LikeLiked by 1 person
Oh my gosh!! So glad to hear! Share pictures if you can! If on instagram, we are @halfbloodsisters 😊
LikeLike
how would you recommend washing the finished robe?
LikeLike
According to the instructions for the fabrics used. Be sure to wash the fabrics before cutting and sewing and that will help a lot. I have done mine in the wash on cold, air dry or hang dry, and learned not to use liquid fabric softener or it leaves spots on my gold fabric for whatever reason. I don’t wash it very often, but it should be ok in a washer on delicate or so.
LikeLike
Muchas gracias. ?Como puedo iniciar sesion?
LikeLike
how would you recommend washing the finished product?
LikeLike
Hello! Your work is amazing! Would you consider doing this for commission?
Thanks!
LikeLike
Maybe!! I live in Los Angeles CA, send me a message on instagram so I can find out where you live, what size, etc. so I can give you a quote @halfbloodsisters 😊
LikeLike
I am at the sleeve-seeing stage, and I had a question, do I see the black sleeve to both the outer black front as well as the inner liner? Or just the outer shell?
LikeLike
I believe you will want to sew through all the layers so that they stay in place. You can do a baste stitch first so that if something isn’t right it can be easily redone. It’s been a while since I did it, but I think that’s how I did it. Hope this helps!
LikeLike
There will be seam ends visible on the inside of the robe all along the shoulder sleeve seam, but that’s normal and shouldn’t be too noticeable.
LikeLike
Perfect, that’s what I was having a hard time envisioning. If the seams would be visible or not.
LikeLike
Cool, glad that helped. If you don’t want the seams visible there MIGHT be a way, but I can’t see how that would be possible. Not worth it for me, as long as the outside looks good, I’m happy!! 🙂
LikeLike
Trying to make this for a friend as a grad present 🙂 was wondering did u not do a lining for the back? It would be super helpful I think too to add a pic or sketch of how you laid the pieces out on the fabric like the simplicity pattern does. So far that’s the part that has slowed me down. I am in love with your tutorial tho!!
LikeLike
Hi, the way I made it, I actually didn’t line the back. That’s how most people (including the movies) make theirs – if you look between the legs, you just see the black robe, not a color liner. Let me know if you had another question, and good luck! Nice of you to make this as a grad present, they’ll love it I’m sure!
LikeLike
I’m trying to use your instructions to make a robe for my son (8) but I’m using a different pattern (Simplicity 1583) and am struggling mightily with how to piece and cut the lining pieces for the front. Any experience with this pattern or advice?
LikeLike
I am not familiar with that pattern unfortunately. I hope you were able to figure it out!!
LikeLike
needing to make one for my toddler… any advice on that?
LikeLike
Hmm well if you are making a wand pocket keep in mind it may be broken since they are shorter so it may break when they sit – and also toddlers break stuff 😉… just teasing. ☺️ um I don’t know that I have any particular advice, obviously you’ll need far less fabric, and I’m not sure this particular pattern goes that small, so you may be working with a different pattern. Check the pattern sizes before buying. I would say if you have questions from the change in pattern along the way let me know. Good luck!! I just had my first baby two months ago and I can’t wait to dress her up, so I totally understand! 👍☺️
LikeLike
yours turned out so great. all of them i see on etsy don’t look feasible and not quite as legit as yours!
GREAT WORK!
LikeLiked by 1 person
Thank you so much!! I think it’s cause I’m such a big HP fan I knew exactly what I wanted and making it for myself I could spend lots of time on it. I think if you make it to sell, it only makes sense to cut corners since no one would pay for 8 + hours of your time, the robe would just be so expensive. I think part of it is knowing I wanted it to have more fabric than the ones they sell at the park, giving it the billow-y effect of Snape’s cloak. ☺️ so nice of you to say, and good luck with making yours! 👍💕
LikeLike
Literally just left Universal Studios Orlando and I can’t believe all the compliments my husband and I got on our robes! We are both Ravenclaw, and even though the blue I chose was a bit different than the blue used in the shops, our robes looked so much better and felt like such better quality and people would stop us and ask about them! I wish there was a way to share pictures on here, but thank you for this great tutorial! 💙
LikeLiked by 1 person
Wow that’s so great to hear!! Wish I could see photos too, but it sounds like you did a great job!!
LikeLike
I don’t know. How do you log in? Is that what you are asking?
Yo no sé.
LikeLike